今回はkerasを使って、AWSのGPU環境下で5百万枚の画像を訓練してみた。ラベル数は200ラベル。おそらくビックデータと呼ばれる規模だと思う。エラーとか、障壁が多々あったので、備忘録もかねて工程を一通りまとめてく
目次
・EC2にGPU適用&jupyter環境構築
・tfrecordから画像の読み込み(input image)
・訓練(training)
・学習率
・GPU環境下での訓練
・モデルの保存
・テスト・予測
・最後に
EC2にGPU適用&jupyter環境構築
①Deep learning ubuntu(linux)で検索、インスタンス作成、作成時に「EPS-optimize( EPS最適化)」を選択
②あとはチュートリアル通りに最後までやれば、GPU環境を構築できる。
(https://docs.aws.amazon.com/ja_jp/AWSEC2/latest/UserGuide/install-nvidia-driver.html )
**補足**
・チュートリアルの下のコマンドはlinuxパッケージのみ必要らしい。
sudo yum erase nvidia cuda
・GPUの型番を確認コマンド ([ ]の中がGPUの型番に該当)
sudo update-pciids
lspci | grep -i nvidia
jupyter notebook 設定について
① 以下のサイトの$ipython以降を実行し、パスワードとか設定https://qiita.com/Salinger/items/c7b87d7000e48be6ebe2
② EC2インスタンスでjupyter用のIPアドレスの設定
EC2のインスタンス画面→対象のインスタンスのセキュリティグループを選択→インバウンドから編集→カスタムTCPルールのポート範囲/送信元を設定(8888/カスタム) →「http://[IPv4パブリックIP]:8888/」にアクセス(ex:http://18.217.126.3:8888/)
③必要なパッケージpipでインストール
④次のコマンドでjupyterの起動
$jupyter notebook &
⑤jupyter上でGPU適用の確認 (「nvidia-smi」コマンドはGPU動作中のみ有効)
from tensorflow.python.client import device_lib
device_lib.list_local_devices()
上のコマンド打って、「name: "/device:GPU:0"〜」みたいなメッセージが出ればOK
tfrecordから画像の読み込み(input image)
だいたい、cifar-10のチュートリアル通り。けど、バッチを作るメソッドの
tf.train.shuffle_batch()
は画像枚数が大きすぎると、メモリを食い過ぎてショートする。tfrecordを複数にしても、ラベルが上手くシャッフルできないせいか、損失関数が上手く減少しない。ここら辺のロジックは、なかなかセオリー通りにいかないので、以下のコードで読み込ませた。
def distorted_input(data_files, batch_size, train=True, num_readers = 60):
    num_class=200
    if train:
        filename_queue = tf.train.string_input_producer(data_files, shuffle=True, capacity=16)
    else:
        filename_queue = tf.train.string_input_producer(data_files, shuffle=False, capacity=1)
    num_preprocess_threads = 60
    examples_per_shard = 1024
    min_queue_examples = examples_per_shard * 16
    if train:
        examples_queue = tf.RandomShuffleQueue(capacity=min_queue_examples + 3 * batch_size,
                min_after_dequeue=min_queue_examples, dtypes=[tf.string])
    else:
        examples_queue = tf.FIFOQueue(capacity=examples_per_shard + 3 * batch_size,
                                      dtypes=[tf.string])

    # Create queue
    if num_readers > 1:
        enqueue_ops = []
        for _ in range(num_readers):
            reader = tf.TFRecordReader()
            _, value = reader.read(filename_queue)
            enqueue_ops.append(examples_queue.enqueue([value]))
        tf.train.queue_runner.add_queue_runner(
            tf.train.queue_runner.QueueRunner(examples_queue, enqueue_ops))
        example_serialized = examples_queue.dequeue()
    else:
        reader = tf.TFRecordReader()
        _, example_serialized = reader.read(filename_queue)

    images_and_labels = []
    for thread_id in range(num_preprocess_threads):
        image, label_index = parse_example_proto(example_serialized)
        images_and_labels.append([image, label_index])

    images, label_index_batch = tf.train.batch_join(images_and_labels,
             batch_size=batch_size, capacity=2 * num_preprocess_threads * batch_size)

    height = 150
    width = 150
    images = tf.reshape(images, shape=[batch_size, height, width, 3])

    return tf.subtract(tf.div(images,127.5), 1.0), tf.one_hot(tf.reshape(label_index_batch, [batch_size]), num_class)


def parse_example_proto(serialized_example):
    height = 150
    width = 150
    features = tf.parse_single_example(serialized_example,
                        features={"label": tf.FixedLenFeature([], tf.int64),
                                  "image": tf.FixedLenFeature([], tf.string)})
    label = tf.cast(features["label"], tf.int32)
    imgin = tf.reshape(tf.decode_raw(features["image"], tf.uint8), tf.stack([height, width, 3]))
    image = tf.cast(imgin, tf.float32)
    distorted_image = tf.image.random_flip_left_right(image)
    distorted_image = tf.image.random_brightness(distorted_image, max_delta=63)
    distorted_image = tf.image.random_contrast(distorted_image, lower=0.2, upper=1.8)
    distorted_image.set_shape([height, width, 3])
    return distorted_image, label
num_readers と num_preprocess_threadsの数を増やしてやれば、大容量でも上手く読み込めた。枚数が億単位になるとできるか不明。
batch数は32×GPU数(今回は32×8=256)が一番安定して、損失関数が減少した。
tfrecordファイルの作成について
tfrecordはprotocol buffer 形式で画像とラベルがペアで入ってる。けど、tfrecordにこだわらず、pickleファイルとか他のファイルでも問題ない。
tfrecordはたまたま使いやすいから、個人的に使っているだけ。枚数が増えてメルカリみたいに転移学習を用いる環境下ではむしろtfrecordは向いてないので、適材適所でファイルは使うべき。
ちなみに1ラベルごとに1つのtfrecordを作成したので、合計200ファイル。ラベルごとの作成過程は、
urlを呼び出してcsvに保存→s3からディレクトリに保存し→tfrecord作成
まで一連の過程を1ラベルごとにした。
例
label_0.csv → label_0(ディレクトリ)→train_label_0.tfrecords
こんな感じでやると以下の利点があって、一番効率がよく作成できた。
・問題が起こってもすぐ作り直せる
・for文で連鎖的に呼び出せる
path='/home/ubuntu/train_tf'
filenames = [os.path.join(path, 'record_%d.tfrecords' % i) for i in range(0, 200)]
・ミスなく作れる
ちなみに全tfrecordの中身の画像枚数は下のコードでカウント
# pathの読み込み
path=[os.path.join('/home/ubuntu/train_tf/record_%d.tfrecords' % i) for i in range(0, 200)]

# データ数カウント
cnts=0
for i, p in enumerate(path):
    cnt = len(list(tf.python_io.tf_record_iterator(p)))
    print("NO:{}, データ件数:{}".format(i, cnt))
    cnts+=cnt
print("合計データ件数:{}".format(cnts))
訓練(training)
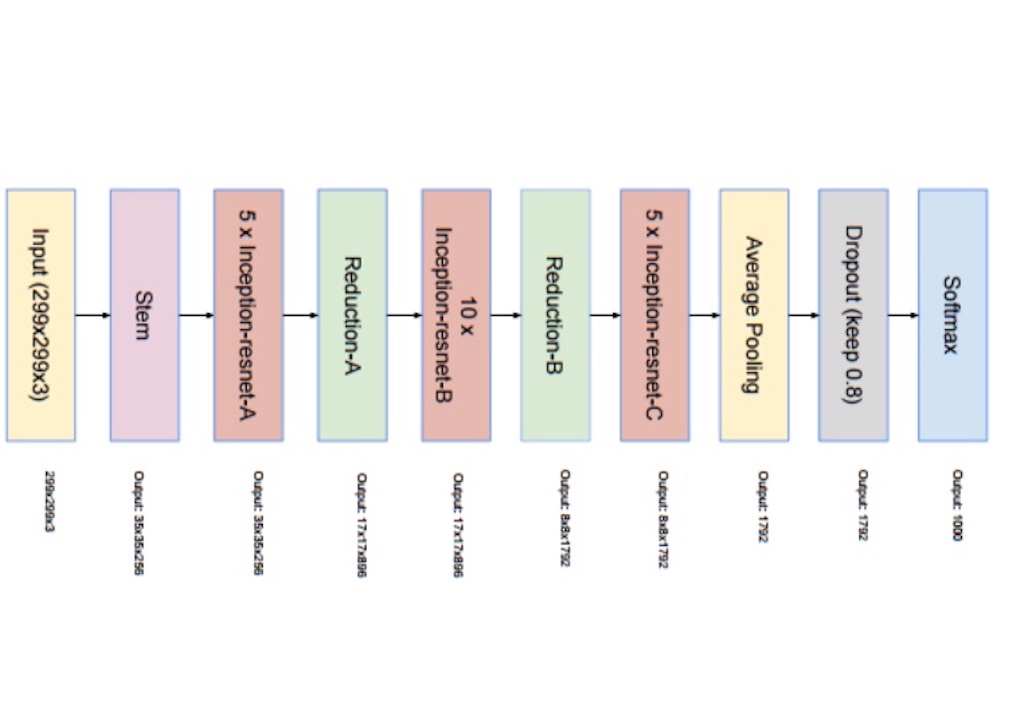
モデルはinception_ resnet_v2を使用。

訓練のメイン部分
sess = tf.Session(config=tf.ConfigProto(allow_soft_placement=True, log_device_placement=False))
K.set_session(sess)

# lr = tf.train.exponential_decay(0.1, global_step, decay_steps, learning_rate_decay_factor, staircase=True)

def step_decay(epoch):
    initial_lrate = 0.01
    decay_rate = 0.5
    decay_steps = 8.0
    lrate = initial_lrate * math.pow(decay_rate,
           math.floor((1+epoch)/decay_steps))
    return lrate


NUMN_GPUS = 8
batch_size=32*NUMN_GPUS

train_image, train_labels=distorted_input(filenames, batch_size, train=True)

with tf.device('/cpu:0'):
    train_model= InceptionResNetV2(train_image)
pmodel= multi_gpu_model(train_model, gpus=NUMN_GPUS)
pmodel.compile(optimizer=SGD(lr=0.01, momentum=0.9, decay=0.001, nesterov=True),
                    loss='categorical_crossentropy',
                    metrics=['accuracy'], target_tensors=[train_labels])

# callback
history = History()
callback=[]
callback.append(history)
callback.append(LearningRateScheduler(step_decay))


tf.train.start_queue_runners(sess=sess)
coord = tf.train.Coordinator()
threads = tf.train.start_queue_runners(sess, coord)
try:
    pmodel.fit(steps_per_epoch=int(5101031/batch_size), epochs=3, callbacks=callback)
finally:
    train_model.save('/home/ubuntu/check_dir/inception_model_ep8.h5')
coord.request_stop()
coord.join(threads)

K.clear_session()
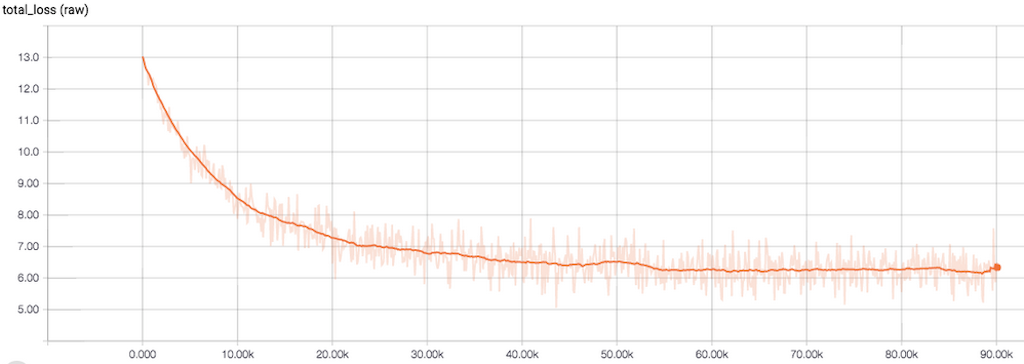
損失関数はこんな感じで順調に減少。3エポックくらいから減少しなくなった。

学習率
cifar-10とかで使ってる学習率の調整用メソッド
tf.train.exponential_decay()はkerasの場合、次で代用できる。
(tf.train.exponential_decayの引数「global_step」は kerasではepoch)
def step_decay(epoch):
     learning_rate = 0.01
    decay_rate = 0.5
    decay_steps = 8.0
    lrate = learning_rate  * math.pow(decay_rate,
           math.floor((1+epoch)/decay_steps))
    return lrate
これを
callback.append(LearningRateScheduler(step_decay))
でcallbackに入れれば、epochごとに最適な学習率に調節してくれる。パラメータは自分で調整した。
resnet系のoptimizerのベストプラクティスに関しての詳細はここら辺のサイトに詳しくのってる。→参考サイト
SGD+Momentumとnesterov=Trueがベストプラクティスらしい。パラメータはチュートリアルとか、論文読みあって総括して決めた
GPU環境下での訓練
kerasの場合、複数のGPUを使用するなら、modelをmulti_gpu_model()の引数に代入する必要がある。インスタンスタイプのp2_8xlargeはGPUを8こ搭載してるので、gpus=8にしてる。
またモデルの読み込みはCPU上でやらないと、OOMエラーが出る
with tf.device('/cpu:0'):
    train_model= InceptionResNetV2(train_image)
またOOMエラー対策かわからないけど、GPU使うときはtf.Session内で、次のおまじないが必要。
sess = tf.Session(config=tf.ConfigProto(allow_soft_placement=True,
log_device_placement=False))
モデルの保存
訓練はmulti_gpu_model()メソッドで作成したモデルでやってるけど、
保存はmulti_gpu_model()メソッドに入れたモデル(ここではtrain_model)を保存しないとダメ。このときモデルの保存にcallbackの
ModelCheckpointはmulti_gpu_model()メソッドのモデルを保存してしまうので使えない。
またモデルの保存は訓練終了時に指定。
coord = tf.train.Coordinator()
threads = tf.train.start_queue_runners(sess, coord)
try:
    pmodel.fit(steps_per_epoch=int(5101031/batch_size), epochs=3, callbacks=callback)
finally:
    train_model.save('/home/ubuntu/check_dir/inception_model_ep8.h5')
coord.request_stop()
coord.join(threads)
テスト・予測
テスト、予測のメイン部分のコード
sess = tf.Session(config=tf.ConfigProto(allow_soft_placement=True, log_device_placement=False))
K.set_session(sess)

NUM_GPUS=8
batch_size=125*NUM_GPUS

test_image, test_labels= distorted_input(filenames, batch_size)
with tf.device('/cpu:0'):
    test_model = InceptionResNetV2(test_image)
test_model.load_weights('/home/ubuntu/check_dir/inception_model_ep8.h5')
test_model= multi_gpu_model(test_model, gpus=NUM_GPUS)
test_model.compile(optimizer=SGD(lr=0.01, momentum=0.9, decay=0.001, nesterov=True),
                    loss='categorical_crossentropy',
                    metrics=['accuracy'], target_tensors=[test_labels])


coord = tf.train.Coordinator()
threads = tf.train.start_queue_runners(sess, coord)

_, acc = test_model.evaluate(x=None, verbose=1, steps=100)
print('\nTest accuracy: {0}'.format(acc))

y_pred = test_model.predict(x=None,verbose=1,steps=100)
LABEL=[]
for i in range(100):
    LABEL.append(sess.run(test_labels))
top_k=sess.run(tf.nn.top_k(y_pred,k=3,sorted=False))
coord.request_stop()
coord.join(threads)
test_model.evaluate(x=None, verbose=1, steps=100)のstepsとバッチサイズは、読み込むテスト画像とぴったり合うようする必要がある。
今回はテスト画像枚数が10万枚なので、steps=100 、batch_size=125*8
にして、1000バッチを100回繰り返して、10万枚の画像を読み込んだ。
また評価用にラベルもtfrecordから取り出した。
LABEL=[]
for i in range(100):
    LABEL.append(sess.run(test_labels))
あとは混合行列と、f値で評価
# Accuracy , F-score.etc
print('acuracy:{}'.format(accuracy_score(label_batch,f_pred)))
label_string = ['{}'.format(i) for i in range(200)]
print(classification_report(label_batch, f_pred,target_names=label_string))
最後に
今回は、
・環境が整ってない
・5百万単位の大規模データでの訓練
の2つが要因でエラーが多々発生した。
反省点としては
・停滞したら、立ち止まって調査、考える時間にあてる
・思考時間とPC作業の割合は7:3くらいが自分にはベストプラクティス
これ以上枚数が増えると、一部の界隈(メルカリ)みたいに
転移学習+次元削減(PCAとか)+faiss
を使うような、効率性を追求した環境構築の必要あると思った。
EC2、S3関係のコマンドメモ
# sshのバージョン
$ ssh -V
OpenSSH_7.9p1, LibreSSL 2.7.3

# ssh鍵をジェネレート
$ ssh-keygen -t rsa
$ mkdir ~/.ssh
$ mv id_rsa.pub ~/.ssh
$ mv id_rsa ~/.ssh
$ cd ~/.ssh # 移動しておく
# .ssh配下にauthorized_keysがない場合
$ mv id_rsa.pub authorized_keys
$ chmod 600 authorized_keys && chmod 600 id_rsa
・キーの作成
# ec2インスタンスへのログインキーの作成・保存
cp path/to/フィル名.txt ~/.ssh/任意の名前

chmod 400  ~/.ssh/名前
・sshでログイン
$ ssh -i ~/.ssh/任意の名前 root@
・scpコマンドで、フォルダorファイルコピー
# EC2からローカルにファイルのコピー
例
scp -i ~/.ssh/aws_develop_sec /Users/Downloads/test.tfrecords ubuntu@13.231.234.143:/home/ubuntu/test.tfrecords
# ローカルからEC2へファルダのコピー
例
scp -r -i ~/.ssh/aws_develop_sec /Users/Downloads/prediction_img centos@13.231.108.156:/home/centos/prediction_img
# EC2からローカルへフォルダのコピー
例
scp -r -i ~/.ssh/aws_develop_sec centos@13.231.234.17:/home/centos/test /Users/Downloads/tfrecords/test
# EC2からs3へフォルダのアップロード
例
aws s3 cp a s3://cnn-image --recursive --acl public-read --cache-control “max-age=604800"
# S3にディレクトリごとupload・download
$ aws s3 cp <ディレクトリ名> s3://<バケット名>/<バケット名>/ --recursive --acl public-read --cache-control "max-age=604800"


# S3からローカルにダウンロード
$ aws s3 cp s3://バケット名/ . --recursive
・sshのログインがキレてもpythonを動かし続けられるコマンド(バックグラウンド→ https://qiita.com/alancodvo/items/15dc36d243e842448d33)
例
$ nohup python Inception_keras_gpu_train.py &