人気の「age gender estimation」とかいう、人間の顔から性別と年齢を予測するモデルを作った時の、テクニックを備忘録として忘れないようにまとめとく。
目次
1.Age-gender-estimation model本体
2.後処理での工夫
3.予測結果
1. Age-gender-estimation model本体
Inceptionv3を使った。ラストの部分以外、特に変わった工夫はしてない。
from tensorflow.keras.applications.inception_v3 import InceptionV3
from tensorflow.keras.layers import *
from tensorflow.keras.models import Model
from tensorflow.keras.optimizers import *

EPOCHS = 5
BATCH_SIZE = 8
HEIGHT = WIDTH = 299

def load_model(gender_cls=2, generation_cls=6, identity_cls=21):
    adam = Adam(lr=0.0001, beta_1=0.9, beta_2=0.999, epsilon=1e-07, decay=0.0)
    input_shape = (HEIGHT, WIDTH, 3)
    base_model = InceptionV3(input_shape=input_shape, weights='imagenet', include_top=True)
    bottle = base_model.get_layer(index=-3).output
    bottle = Dropout(rate=0.3)(bottle)
    bottle = GlobalAveragePooling2D()(bottle)
    # gender
    gender_output = Dense(units=gender_cls, activation='softmax', name='gender_output')(bottle)

    # generation
    generation_output = Dense(units=generation_cls, activation='softmax', name='generation_output')(bottle)

    # identity age
    identity_outout = Dense(units=identity_cls, activation='softmax', name='identity_outout')(bottle)

    model = Model(inputs=base_model.input, outputs=[generation_output, identity_outout, gender_output])
    model.compile(optimizer=adam,
                  loss={'generation_output': 'categorical_crossentropy',
                      'identity_outout': 'categorical_crossentropy',
                      'gender_output': 'binary_crossentropy'},
                  #loss_weights={'realage_output': 1, 'gender_output': 10},
                  metrics={'generation_output':'accuracy',
                           'identity_outout':'accuracy',
                           'gender_output': 'accuracy'})

    model.summary()
    return model

if __name__=='__main__':
    model = load_model()
2.後処理での工夫
人間はそれぞれ個性があるので顔自体は2〜3歳でもほとんど変化しないという性質を利用。
下は人間の顔のしわの数が年齢毎に増加するのをグラフにしたもの。

歳をとるごとにしわが増えているのがわかる。
そこでまずは全年齢を予測するのは難しいので、以下の手順で問題を細分化して簡単にした。
1.generation(世代)=6カテゴリ、identity-age(大まかな年齢)=21カテゴリを予測対象
2.generationとidentity-ageを予測

3.予測したgenerationから、identity-ageの範囲を絞り、そこから年齢を求める

というふうに難しい問題を簡単に分割して予測誤差を減らした。
こうすれば100歳分の予測やカテゴリ分類よりは簡単かつ正確にできる。
後処理コード
# 世代で0~7, 7~15, 15~25, 25~45....の6カテゴリに分類

def return_generation(age):
    if age <7:
        return 0
    elif age >=7 and age<15:
        return 1
    elif age >=15 and age < 25:
        return 2
    elif age >=25 and age < 45:
        return 3
    elif age >=45 and age <70:
        return 4
    elif age >=70:
        return 5
6クラスで世代を予測。 正解率は 83%
identity ageを21クラスで予測。 正解率は 46%
まず世代を予測して、indeentity-ageの範囲を絞り、次にidentity-ageとnp.argmaxで大まかな実年齢を求める。
難しい問題を簡単な問題に分割してやることで劇的に正解率が向上した。
class PostProcess(object):
    def __init__(self, pred_generation, pred_identity):
        self.pred_generation = pred_generation
        self.pred_identity = pred_identity

    def generation2identity(self, generation):
        if generation==0:
            return 0, 3
        elif generation==1:
            return 3, 5
        elif generation==2:
            return 6, 9
〜〜〜〜略〜〜〜〜


    def post_age_process(self):

        # generation(予測した世代)からidentity-ageの範囲のindexを取り出す
        lowidx, largeidx = self.generation2identity(np.argmax(self.pred_generation))
        print("lowidx, largeidx from generation", lowidx, largeidx, np.argmax(self.pred_generation))

   # identity-ageの範囲を絞る
        slice_pred_identity = self.pred_identity[0][lowidx:largeidx]
        print('pred_identity', self.pred_identity)
        print('list', slice_pred_identity)
        print("pred identity idx", np.argmax(slice_pred_identity)+lowidx)

   # identity-ageを求めて、実年齢に変換
        a = np.argmax(slice_pred_identity)+lowidx
        if a==0:
            return 2
        elif a==1:
            return 4
        elif a==2:
            return 6
        elif a==3:
            return 9
〜〜〜略〜〜〜
3.予測結果
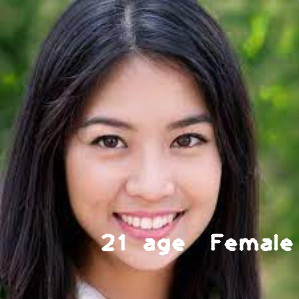
顔1
予測年齢:21歳 Famale
顔2

予測年齢:2歳 Female
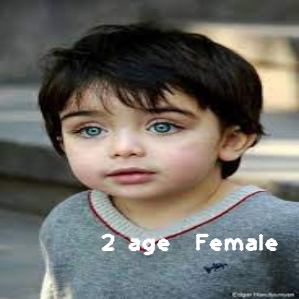
かなりうまく予測できてる感じする。
全体コード
import os
os.environ['KMP_DUPLICATE_LIB_OK']='True'

import sys
import time
import cv2
import numpy as np

from models import model, load, identity_age
from models.load import to_mean_pixel, MEAN_AVG

x = 100
y = 250
savepath='/Users/~/desktop/'

age_estimate_model = model.load_model()
age_estimate_model.load_weights('weights/best.hdf5')

def draw_label(image, point, label, font=cv2.FONT_HERSHEY_PLAIN,
               font_scale=1.5, thickness=2):
    text_color = (255, 255, 255)
    cv2.putText(image, label, point, font, font_scale, text_color, thickness, lineType=cv2.LINE_AA)


img_path='image1.jpg'
img = cv2.imread(img_path)
img = cv2.resize(img, (299, 299))
cimg = img.copy()
img = to_mean_pixel(img, MEAN_AVG)
img = img.astype(np.float32)/255
img = np.reshape(img, (1, 299, 299, 3))

generation, iden, gender = age_estimate_model.predict(img)
pred_identity = PostProcess(generation, iden).post_age_process()

pred_gender = "Male" if np.argmax(gender) < 0.5 else "Female"
print('gender is {0} and predict age is {1}'.format(pred_gender, pred_identity))
label = "{0} age  {1}".format(int(pred_identity), "Male" if np.argmax(gender) < 0.5 else "Female")

draw_label(cimg, (x, y), label)
cv2.imwrite('prediction.png', cimg)
こういう誤差をなくすように工夫することで、重いベンチマークのモデルを使わなくても簡単なモデルでかなりいい具合の予測ができた。
人間の脳と同じで問題がむずければ完璧主義はやめて、園児が解けるレベルに簡単にしても十分性能の良いモデルができる。