今回はJetson nanoでPWM(Pulse Width Modulation)制御をするまでの手順をまとめてく。
Jetson nanoでPWMのPinは「32, 33」の二つ。
これを使ってサーボモータをマルチスレッドで二つ動かす。
目次
1. 配線図
2. Jetson nanoでGPIOのインストール
3. PWM設定-「Jetson-IO tool」の実行
4. PIN番号を合わせる
5. PWMでサーボモータを制御
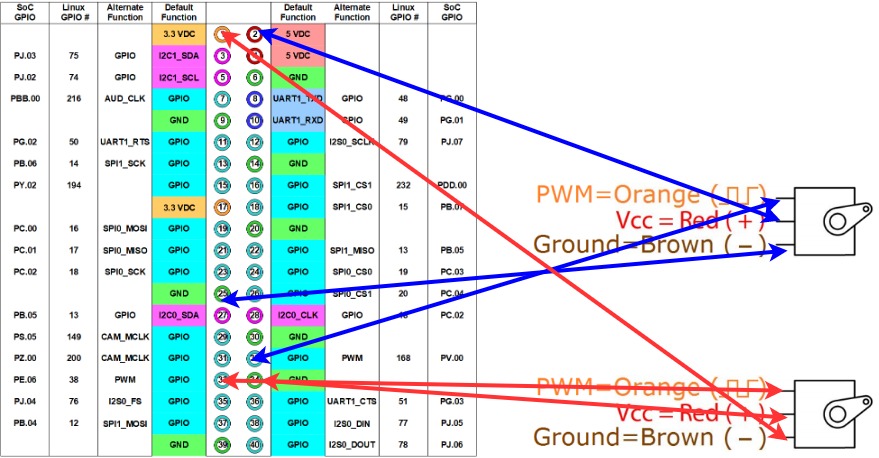
1.配線図
Jetson nanoの40 PINs(サーボモータの配線は3つあってそれぞれ、PWMとGNDと電圧V。)
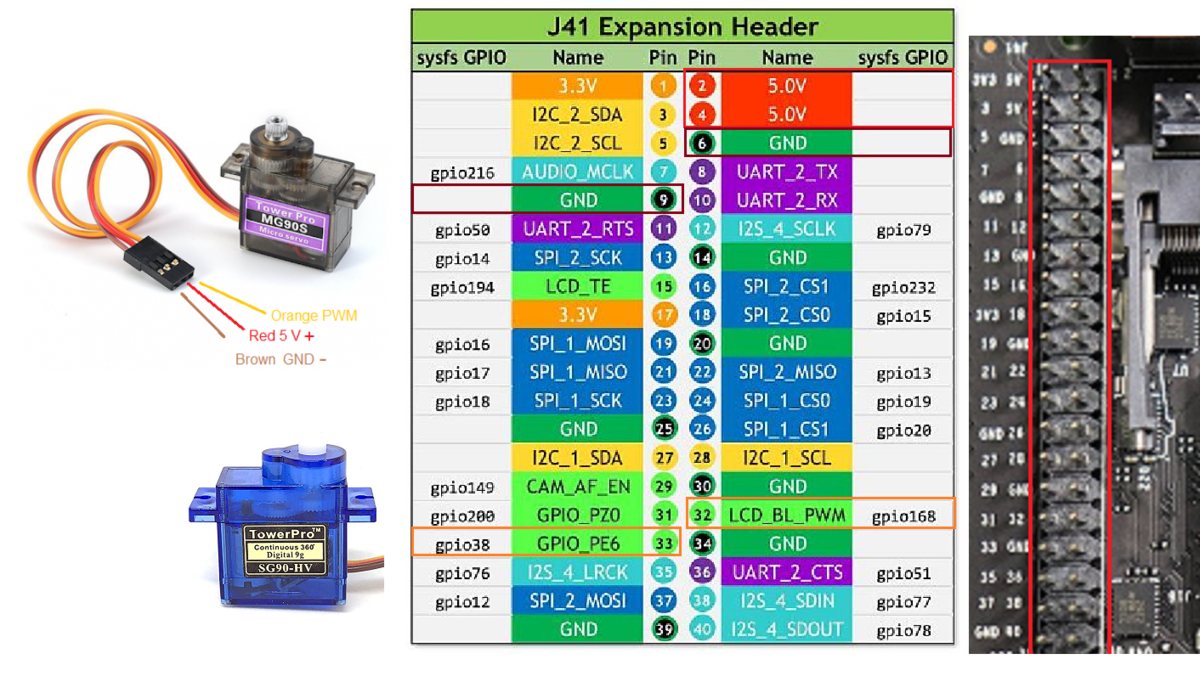
Jetson nanoとサーボモータ(SG-5010)の配線図。
2 Jetson nanoでGPIOのインストール
PWM用のGPIOをインストール。$ git clone https://github.com/NVIDIA/jetson-gpio.git $ cd jetson-gpio $ sudo python3 setup.py install # グループ作成とユーザーの追加 $ sudo groupadd -f -r gpio $ sudo usermod -a -G gpio <ユーザー名> # udevルールの追加と反映 $ sudo cp lib/python/Jetson/GPIO/99-gpio.rules /etc/udev/rules.d/ $ sudo udevadm control --reload-rules && sudo udevadm trigger # 再起動して使えるようにする $ sudo reboot
3 PWM設定-「Jetson-IO tool」の実行
Jetson nanoにあるPINを外部ピンへ拡張する。
$ sudo /opt/nvidia/jetson-io/jetson-io.py
「Jetson Expansion Header Tools」でpwm0, pwm2を選択
「save and reboot to reconfigure pins」で再起動して反映。
|                Select desired functions (for pins):                |
 |                                                                    |
 |                 [ ] aud_mclk      (7)                              |
 |                 [ ] i2s4          (12,35,38,40)                    |
 |                 [*] pwm0          (32)                             |
 |                 [*] pwm2          (33)                             |
 |                 [ ] spi1          (19,21,23,24,26)                 |
 |                 [ ] spi2          (13,16,18,22,37)                 |
 |                 [ ] uartb-cts/rts (11,36)                          |
****jetson-io.py実行時に一瞬、画面に何かが表示されて直ぐに終了してしまう場合
DTB ファイルが /boot ディレクトリ配下に存在しているので、/boot/dtb ディレクトリを作成して、その中にコピー。
cd /boot
sudo mkdir dtb
sudo cp *.dtb* dtb/
再度
$ sudo /opt/nvidia/jetson-io/jetson-io.py
PWMが設定できてるなら下の様にpwm-0, pwm-2がnullになる
$ sudo cat /sys/kernel/debug/pwm
>>>>>>

platform/70110000.pwm, 1 PWM device
 pwm-0   (pwm-regulator       ): requested enabled period: 2500 ns duty: 0 ns polarity: normal

platform/7000a000.pwm, 4 PWM devices
 pwm-0   ((null)              ): period: 0 ns duty: 0 ns polarity: normal
 pwm-1   (pwm-regulator       ): requested enabled period: 8000 ns duty: 1440 ns polarity: normal
 pwm-2   ((null)              ): period: 0 ns duty: 0 ns polarity: normal
 pwm-3   (pwm-fan             ): requested enabled period: 45334 ns duty: 0 ns polarity: normal
4. PIN番号を合わせる
Jetson Nanoでは普通に40PINを拡張しただけではサーボモータが動かない。
サーボモータが動くようにするにはさらに設定が必要で一番苦労したところ。
# assign Pin32 to PWM0
$ busybox devmem 0x700031fc 32 0x45
$ busybox devmem 0x6000d504 32 0x2
# assign Pin33 to PWM2
$ busybox devmem 0x70003248 32 0x46
$ busybox devmem 0x6000d100 32 0x00

$ cd /sys/devices/7000a000.pwm/pwm/pwmchip0
# Control Pin 32 of PWM0
echo 0 > export
echo 20000000 > pwm0/period
echo 2500000 > pwm0/duty_cycle
echo 1 > pwm0/enable

# Control Pin33 of PWM2
echo 2 > export
echo 20000000 > pwm2/period
echo 1500000 > pwm2/duty_cycle
echo 1 > pwm2/enable
設定したらサーボモータが動いた。
・参考記事
5 PWMでサーボモータを制御
1つのサーボモータを動かす
import RPi.GPIO as GPIO
import time

output_pins = {
    'JETSON_XAVIER': 18,
    'JETSON_NANO': 32,
    'JETSON_NX': 33,
    'CLARA_AGX_XAVIER': 18,
    'JETSON_TX2_NX': 32,
    'JETSON_ORIN': 18,
}
output_pin = output_pins.get(GPIO.model, None)
if output_pin is None:
    raise Exception('PWM not supported on this board')


def main():
    # Pin Setup:
    # Board pin-numbering scheme
    GPIO.setmode(GPIO.BOARD)
    # set pin as an output pin with optional initial state of HIGH
    GPIO.setup(output_pin, GPIO.OUT, initial=GPIO.HIGH)
    p = GPIO.PWM(output_pin, 50)
    val = 7.25
    incr = 0.25
    p.start(val)

    print("PWM running. Press CTRL+C to exit.")
    try:
        while True:
            time.sleep(1)
            if val >= 12:
                incr = -incr
            if val <= 2.5:
                incr = -incr
            val += incr
            p.ChangeDutyCycle(val)
    finally:
        p.stop()
        GPIO.cleanup()

if __name__ == '__main__':
    main()
マルチスレッドで2つのサーボモータを動かす
#!/usr/bin/env python

import Jetson.GPIO as GPIO
import time
import threading
import sys
from formura import Angle2Duty

OUTPUT_PIN1 = 32
OUTPUT_PIN2 = 33
CYCLE = 50
t=2

def setup_device():
    GPIO.setmode(GPIO.BOARD)
    GPIO.setup(OUTPUT_PIN1, GPIO.OUT, initial=GPIO.HIGH)
    pw = GPIO.PWM(OUTPUT_PIN1, CYCLE)

    GPIO.setup(OUTPUT_PIN2, GPIO.OUT, initial=GPIO.HIGH)
    ph = GPIO.PWM(OUTPUT_PIN2, CYCLE)
    return pw, ph

def pw_loop(pw):
    while flag:
        dc1 = Angle2Duty(450)
        pw.start(dc1)
        print("width dc {}".format(dc1))
        time.sleep(t)
        dc2 = Angle2Duty(500)
        pw.start(dc2)
        print("width dc {}".format(dc2))
        time.sleep(t)
        dc3 = Angle2Duty(410)
        pw.start(dc3)
        print("width dc {}".format(dc3))
        time.sleep(t)
        dc4 = Angle2Duty(300)
        pw.start(dc4)
        print("width dc {}".format(dc4))
        time.sleep(t)

def ph_loop(ph):
    while flag:
        dc1 = Angle2Duty(120)
        ph.start(dc1)
        print("ph height {}".format(dc1))
        time.sleep(t)
        dc2 = Angle2Duty(180)
        ph.start(dc2)
        print("ph height {}".format(dc2))
        time.sleep(t)
        dc3 = Angle2Duty(240)
        ph.start(dc3)
        print("ph height {}".format(dc3))
        time.sleep(t)
        dc4 = Angle2Duty(170)
        ph.start(dc4)
        print("ph height {}".format(dc4))
        time.sleep(t)


if __name__ == '__main__':
    flag = True
    c=0
    pw, ph = setup_device()
    th1 = threading.Thread(target=pw_loop, args=(pw,))
    th1.start()
    th2 = threading.Thread(target=ph_loop, args=(ph,))
    th2.start()
    while True:
        c +=1
        if c==3000:
            flag =False
            th1.join()
            th2.join()
            pw.stop()
            ph.stop()
            GPIO.cleanup()
            sys.exit(1)
参考記事
・JetPack 4.3 (r32.3.1) で追加された Jetson-IO tool を使用して Pinmux テーブルを設定してみた。・Jetson Nano の 2 つのハードウェア PWM を使用してみた
・Jetson Nano の GPIO にサーボモータをつないで制御してみる